
Happy is part of our family, so when it comes to his comfort, it's not a question that we both want the best for him.
He deserves the absolute best of everything, but I'm sure you all feel the same about your pooches too.
I pamper him so much just to show my love.
He is actually our furbaby.

Once my office was complete, I knew that I want to have a bed in there just for him.
Pugs are very sociable, and he doesn't love to be left alone for a long time, so even when I'm working, he is right there with me.
Happy has so many beds around the house literally in almost every room, but they are almost all the same sort of nesting beds. Plush, no legs or framed structured beneath the foam and fabrics, and it's quite upsetting to see that these pricey beds are losing their shapes after a while.
On the other hand, it's also handy to have as they are easily washable and carriable where we go. This time I wanted a bit different for him. I was after an actual sofa bed with legs.
As usual, I headed to Homesense and to some of my other favourite stores to browse around at the dog bed isles. Unfortunately, I couldn't find anything like that in stores.
I found many online, and I even managed to find the one. It was 250£ plus shipping from the USA.
I meant to buy it for my little doggie that bed but just couldn't make myself spend that much money on it when this won't be even his main bed, he only will be staying in this while he is with me in my office.

So I sat down and started thinking about how could I craft one of those for him while keeping the budget low.
In addition to being budget-friendly, I also wanted to keep the quality as high as possible.
Plus it will be made with love just for him even though he probably doesn't have a clue, but it will make me feel a bit better.

We tend to visit IKEA monthly even though we know the layout of the store and probably all the products at the back of our heads. I love IKEA mainly as I use their types of furniture for DIY projects.
I love to give an extra and unique touch to their products to make them feel like they are mine. So I was sitting in my bed thinking about this sofa bed for Happy then my dad called me on FaceTime and as I was telling him my idea. Suddenly a light bulb literally just lightened up above my bed.
It's easy. I just need a frame to start with. I tend to overthink things even when it's the most straight forward thing on the world for others.
As I hung up the phone with my dad, I started to search on the IKEA website for draw frames with low edges, bed frames to see what comes up.

A product with a name DUKTIG came up when I clicked on it showed: Doll's bed furniture.
My first thought was that it's probably a Barbie-sized bed, so I wanted to see it in real life as we were heading there anyway to pick up the rest of the Billy units for my office.


Honestly, this DUKTIG bed could be IKEA's main selling product for pet owners.
It's measuring 52 cm long and 36 cm wide just the perfect size for a teacup sized or any small breed dogs or even cats.
This bed only cost me 13£, and it comes with a cute matching striped bedlinen set too.
Super cheap and very durable. It's also a great choice if you do not wish to revamp the entire product.
The unfinished pine frame is easy to paint and match any home decor.

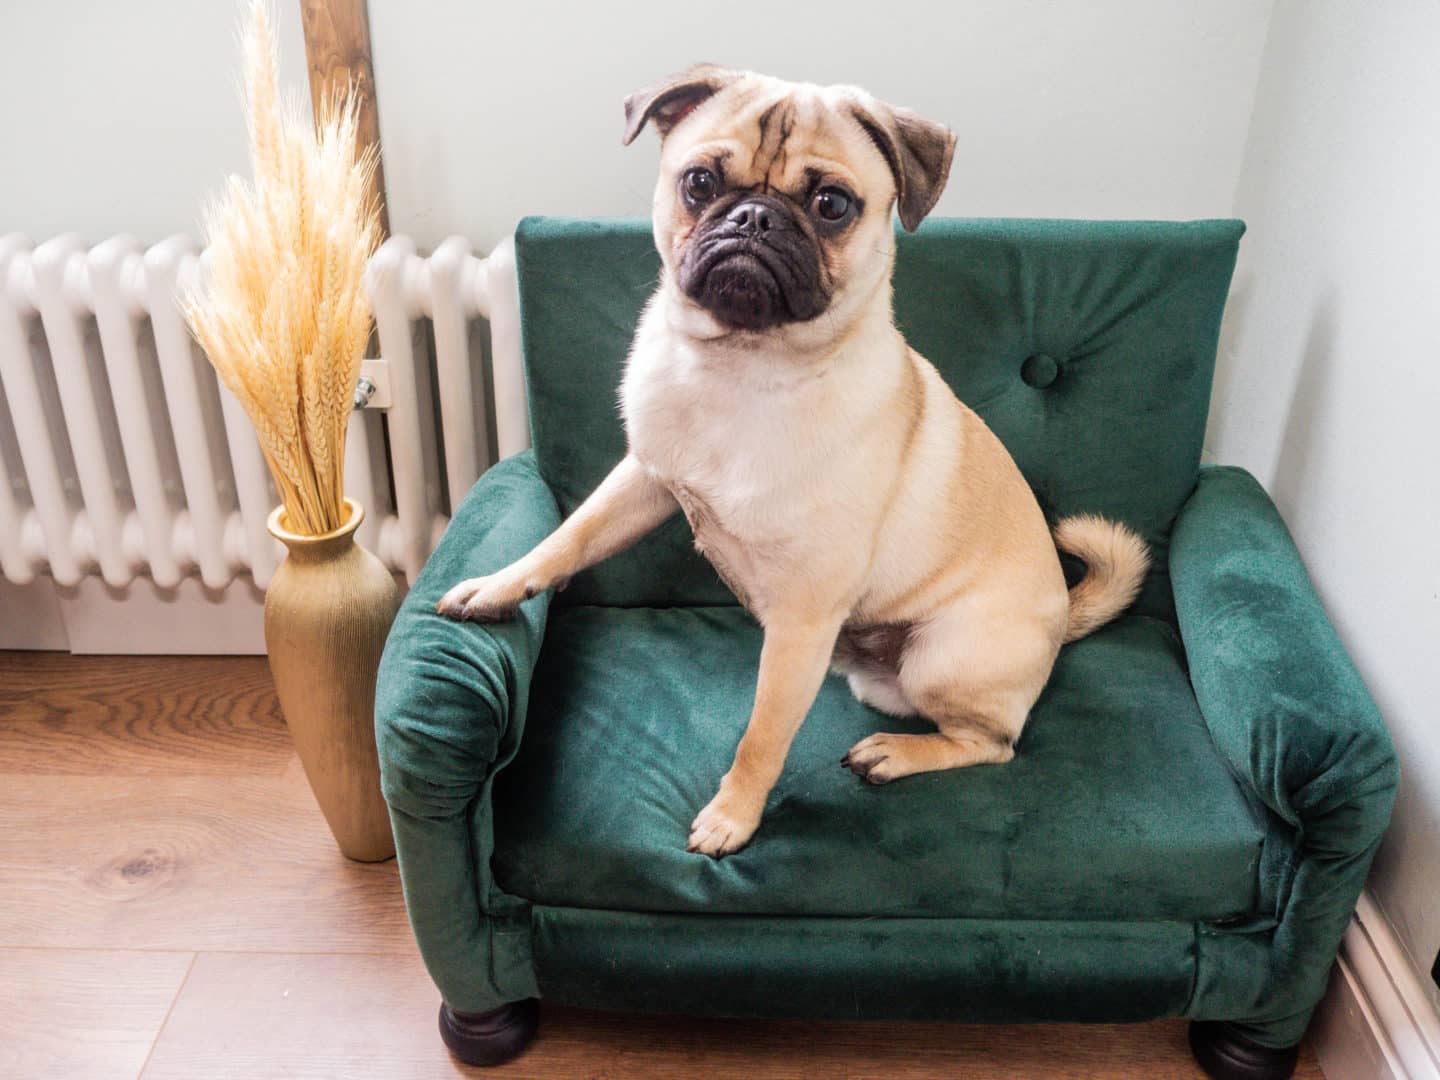
When it comes to sofas, the first thing that pops in my head is a Chesterfield velvet settee, so that was sort of my inspiration for this DIY project.
It's a possibility that a high amount of dogs out there love to nap in a fluffy bed, including Happy.
The problem is that pugs have really sensitive eyes, and due to the size of them, we literally struggle daily to get things of them. When he plays around in his fluffy blanket, he gets so many threads and fluffs on his eyes that it's an absolute nightmare to remove them.
So any sort of fluffy fabric was off my list for his bed.
I also wanted to match his bed with my office colour scheme, so I decided to go for a plush velvet fabric in an emerald, deep green shade. I found some fantastic selection on eBay with only a few days shipping time.
I ordered 4 meters of materials and some buttons in the same colour.

To revamp this wooden bed frame into a cosy sofa, I needed to add foam all around it. Arms, back, the bottom frame itself and of course the seating area. I ordered all different sized upholstery foams again from eBay.
The sizes I used were the following :
Arms: 26x26x1 ( inches)
Back: 18x18x2 (inches)
Seating cushion: 18x18x3 (inches)

I never upholstered anything before, and I quite liked it if I'm honest at the end I actually felt like I want to create one of these in my size too. I was entirely new to this, so I headed over to Pinterest to tutor myself about upholstery. I found out that to attach these foams, I need an upholstery base cloth before actually covering everything with the main fabric. So I ordered them from eBay. They are super cheap. I paid about 2 pounds for all of it.
The legs of this wooden frame weren't right for my ideas, so I wanted to swap them for something a bit more elegant and similar to a Chesterfield sofa leg. I found four adorable small pine moulded bun foot for about 8£ for all on eBay. It's unfinished pine, so it's just perfect to colour it in any shade you want.
So let's jump right into how I revamped this IKEA doll bed into a luxurious dog sofa bed.

Materials:
DUKTIG doll bed from IKEA
Upholstery foam
The sizes I used were the following :
Arms: 26x26x1 ( inches)
Back: 18x18x2 (inches)
Seating cushion: 18x18x3 (inches)
Upholstery base cloth
Plush velvet fabric emerald green 4m + buttons in the same colour
Four pine moulded bun foot
Any strong threads ( I used some strong leftover slim ribbons from Christmas)
52x 36 cm Plywood or MDF sheet
Blackwood paint
Four wood nails
Tools:
Staplegun + staples I used this one
Jigsaw
Sandpaper
Drill
Handsaw
Paintbrush
Pencil
Tape measure
Scissors

Step 1:
I opened the box and followed the instructions to assemble the doll bed. Assembled every part of it expect the wooden sheet that is the seating area. I left that out and placed it aside.
What I actually missed entirely out of the below video is that I removed the legs of the bed frame with my handsaw. I had to use handsaw instead of the jigsaw as I couldn't get to the legs with that.
After that, I used sandpaper to stroke the edge of each leg just to make sure it's completely smooth before I moved on to the next step.
Step 2:
I placed the ready to use frame aside and grab the wooden sheet. I put this sheet on the top of the plywood, and I drew it around. Once I had the measurement of it, I used the jigsaw to cut it. Now I had two of the same sized sheets. One for the back and one for the seating area.
I added an extra piece of timber to have support against the headboard. I drilled this piece into the side frames carefully lining up with the bottom timber.


Step 3:
It's time to play with the foam and the fabric. I started to create the seating cushion than the back of the sofa. I used the thickest foam I purchased for the bottom part.
I grabbed one of the wooden sheets that I had for the seating and placed the foam on the top. I drew the wooden sheet size on the foam, and I cut off the excess using a handsaw.
To attach them, I used the upholstery base cloth and covered the entire foam from every angle. To make sure everything stays in their place, I secured it with my staple gun.
I measured the fabrics out for it and repeated the same process. I folded then stapled the green fabric around the foam. After this, I was done with the bottom part.
Step 4:
Now, this was probably the trickiest part of it all. I used the other wooden plank that I had left and started measuring. I halved the size vertically, and horizontally then I halved it again on both sides. Then I picked five places where the lines were crossing each other. Two top, bottom corner and one in the middle. After that, I drilled through it to create five different holes. As a next step, I placed the second thickest foam on the top once I measured it and cut it then I turned it over using a screwdriver to poke holes through the foam at the same places where the wooden sheet already had the holes.
I measured enough upholstery cloth for the back sheet and covered this entire part using a staple gun to secure the fabric in place again. I used a screwdriver to poke holes again to make sure that the first holes I created on the wooden sheet were showing all the way through to the top layer. After that, I measured the green fabric and cut it. I placed it on the back part then stapled on three sides, leaving one completely open.
I wanted to create the ottoman headboard feature, so I bought some same fabric and colour buttons as the sofa. I used an old durable slim ribbon that I had left from Christmas and got it through the buttonhole. I repeated this process five times. Once all my buttons were ready to go on the headboard, I used a screwdriver as I do not own an upholstery needle to get the strings through all the layers. If I'm completely honest, it took me a while, but I managed to get them where they needed to be so I knot them and stapled it just for extra security. Once all the buttons were at their place, it was time to close to the headboard. To secure everything I folded the fabrics and stapled all the way around.


Step 5:
Now I had two cushioned parts done. After this, I moved back to the mainframe. By now, you should all know the basic process of upholstery. So I did precisely the same thing all around the frame. Using the slimmest foam I had left, I moved my way around attaching the foam using upholstery base cloth. Once every part was covered, I grabbed the fabrics sheet measured and stapled the same way as I did before. Be careful with the stapling at the places where they could be visible; make sure you fold the fabric over them to cover.
Step 6:
I had a ready frame and two parts, so I attached everything all together. And moved my way to the legs. I didn't do much with them just painted them black and used screws to secure them in place. I didn't have to measure where they were going as where the old legs were attached had just the perfect place for the ones.

This easy DIY project could have taken just a few hours to make, but as I ordered less materials as I needed, I had to wait another day to finish it. I ordered 3 meters of green fabric first, so I was short with 1 meter.
Honestly, I'm so happy how this bed turned out and what makes my heart melts, even more, is that Happy seems to love it so much. It's of course not the most comfortable bed he has due to the size of it as he tends to sleep on his back sometimes too which is impossible in this bed, but it's enough for him to lie down, it's perfect for him to chew on a toy or a bone while he is on the office with me for a few hours. He actually runs and jumps right into this bed every time I head towards my office. It's so adorable.

As always if you have any questions, please let me know in the comment below.
See you next time.


